
How does it feel when your once-crystal clear headlights now look like old dirty – wrap in the wax paper? However, it is safer to learn how to clean and polish them up yourself to maintain the look of your vehicle. How to clean headlights Understanding to inspect the headlights to estimate the state of damage will help you learn how to perform the task. Later you can determine to abrade the wear and shine to make your headlights look like a pro. Here are the fantastic tips that will help you to learn how to clean headlights easily. So, without any further ado. Let’s delve into it!
Part #1: Getting Started to clean headlights
See if the headlights from the tip and top determine what approach makes the most sense. If you notice that your headlights are blur or not as brittle as they formerly were, check them in the daytime. It is crucial to understand how bad the cracks are to understand which cleaning methods will be the most suitable! Whether you require to get the car headlights tested professionally or by yourself, check if they need to be replaced or not. Besides, figure out the intense abrasions and marks that might be indications of more severe issues.
Part #2: Wash them with Regular Soap to clean headlights
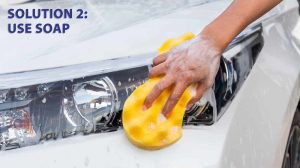
Daily road grit and dirt can set your headlights to look sloppy and unclear to a state that can make a more analysis difficult. Before you begin looking for particular problems, wash your car with natural warm water. And vehicle washing soap. Now, wipe down the lights and let them air-dry completely. After this, check them to look for issues.
Part #3: Look for yellowing, cracks, and hazing.
Once you have your car washed, you can now determine how your vehicle looks. Try to notice all of the hard coats at the beginning to lose adhesion to the polycarbonate lens. The UV radiations create a new recurrent unit in the carbon chain that swallows blue light and ends in a yellowish color. Also, look for hazing and cracks – so you can take corrective steps. Bear in mind: the sturdy coat can result in flaking off or peeling. Ultimately, you will notice scrapes deep into the headlights. It will indicate that you will need to take your headlights to a professional for resurfacing.
Part #4: Sanding the Headlight
Get some grades of wet and dry sandpaper. To begin the process, you have to buff out the lights. Try to use a fine series of sandpaper. Usually, 3M is ideal for this job, and users typically wish to have at least one more inferior grade (1500 or so) and a smoother grade to finish the headlight (about 2000). If you require to begin with rougher sandpaper, that is up to you.
- Apply the sandpaper around the headlights.
- Wet them thoroughly.
- Use a mirror cleaner and wipe the screen in up and down motions.
- Now, tape off the sandpapers and see the results.
Read also: How to wash a weighted blanket
Part #5: Polishing the Headlights
The last step is to pick a buffing compound. After completing the sanding process, the headlights will have no more hazing. It is time to turn to a buffing spray of any kind. There are tons of different choices available in the market. We suggest you visit an auto parts shop. And grab them to enhance the shine of your headlights.
Final Words
Now, you can do anything at home – no need for professional help. Just follow the easy steps and make your car’s headlights look shiny as they once were!


Hello! Do you use Twitter? I’d like to follow you if that would be ok.
I’m definitely enjoying your blog annd look forward
to new posts.
my web-site Used surfboards Near me
Right here is the right blog for everyone who hopes to find
out about this topic. You know a whole lot its almost tough to argue
with you (not that I actually will need to…HaHa).
You definitely put a fresh spin on a subject
that has been written about for a long time.
Wonderful stuff, just wonderful.